
Hello Masrizky.sch.id friends, how are you still enthusiastic? Be enthusiastic, like the admin is always enthusiastic in creating content like this for you to read and learn, okay this time the admin will provide information on how to register a website on the latest version of Google Adsense, and what exactly is Adsense? let's discuss it
Info: Rather than being curious, let's just discuss it together, come on.
What is adsense
Maybe you often hear lately about adsense, how to register adsense, how to make money through adsense and so on!!! Do you already know what adsense is? Adsense or Google adsense is an advertising service formed or built by the Google company, and by using adsense you can make money with one condition you must have content or a container to be able to display the advertisement such as a website, blog, or YouTube
Info: Google Adsense is only for content creators to display ads in their content.
Adsense Latest Version
Why does the admin call the latest version of Google Adsense? Because currently the appearance of Google Adsense is really different from a few years ago, when or when you want to register a website especially, the way or method used has also changed a little
Info: So the admin will provide a comparison regarding the methods used when registering a website on the latest version of Adsense and the previous version of Adsense, okay?
Easier to understand
In the latest version of Google Adsense, the website registration method is really easier to understand for internet users, especially for content creators who are or want to use Adsense services.
because if we go back to previous years, to register a website on Google Adsense was quite complicated, for information in the previous version when you wanted to use the Adsense service you had to register your website identity and then set the payment method and the site linking was really divided, meaning if you have completed the website registration, you have to wait again to be able to link the site and set the payment method and this is a bit confusing for people who are not tech savvy hehehe
Info: The point is that the current version of Adsense is simpler, all registration methods are collected into one in the Adsense homepage settings menu
How to register
Okay, now it's time for the admin to discuss how to register a site on the latest version of Google Adsense.
Info: Please read and study this article until the end, so that there is no misunderstanding okay? Okay!! Sip
Visit to Website
The first step you can take is to visit the official Google Adsense website to register your website via Google adsense
Start account registration
So, once you are on the official Google Adsense website, you can click the Start button to register an account, or register, as shown in the image below.

For your information: In the display above, the image or page is no different from the previous version, yes, you could say that the Adsense display has been like that for a long time ☝️
Sign in with Google
After you use the Start button , you will be directed to the login page via your Google account, as shown in the image below.
Info: Please log in to Adsense using your Google account by filling in your email and password, or select your Google account if you have more than one account.

Info: Yes, you can understand this and there's no need for the admin to teach you how to log in using a Google account, it'll just get even more complicated, oh my.
Fill out the registration form
After you log in using your Google account, you will then be directed to the registration form filling page, such as setting the website address, setting the country location, and so on, as shown in the example image below.

Info: An important step that you must and should not be missed is to check the terms and conditions then click the Start Using Adsense button to continue as shown in the image above
Adsense homepage view
Well, friends, this is the thing that most differentiates the latest version of Adsense from the previous version. In this latest version, all website registration methods are collected together, and each Adsense menu (click the menu in the upper left corner to see it) is already open, meaning it can be used even if you only check the menu

Info: The image above is an example of the appearance of the Adsense home page
Did you know, young Blogger friends, that previously in the previous version, these menus could not be accessed at all when registering, and now you can easily access them even if your site has not been approved?

Info: The image above is an example of the menu function of the Adsense settings that you can access. Although there are menus that are also locked, meaning they cannot be used, there are many menus that you can access in the latest version currently
Payment Methods
To start using Adsense and registering a website, you can start by setting up a payment method, and the way to do this is in the Adsense home menu, you can select the Payment method , then use the Enter Information button as shown in the example image below

Fill in the Payment Form
Then you will be directed to the payment form filling page, such as name, home address, city, postal code and others, if you have done so you can click the Send button as shown in the example image below

Info: The form above is not a method for withdrawing balances. Later you will have to arrange another payment method specifically for withdrawing payment balances
Connect Site
After you set the payment address, you can then link or connect your website for review. The way to do this is on the Adsense homepage, you can select the Site menu , then you can click the Let's Get Started button , as shown in the example image below

Request a Review
Then to connect the website, you can use the Request a Review button as shown in the example image below

For your information: In the previous version, there were two ways to link a site, namely the manual method and the direct method to a blogger account, and this was done when registering for an AdSense account for the first time
Review Results
Next, you will be directed to The Site or in the Adsense Site menu settings and you can see the review or status of your website, for example, you can see the following image.

Info:If your website has been approved, the status is being prepared.. will change to Redy
Auto Ads
The next step is that you can set up automatic ads, by selecting the ads menu in the Adsense home menu, then you can click the Explore button as shown in the image below

Info: The settings above are optional, meaning you can do them or not, it doesn't matter, because you can also set ad settings if your account has been approved by Adsense.
Enable Auto Ads
Next, you can activate automatic ads by sliding the Automatic Ads button to the right. Once you have done this, you can click the Apply to Site button to activate Automatic Ads
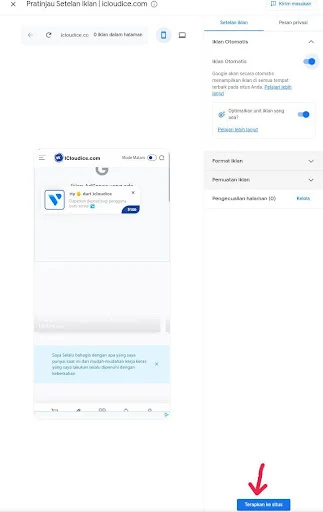
Apply now
Next, you will receive a pop-up notification like the example image below, select the Apply Now menu , then if you have done so, you can click theSave button like the example image below

Get script code
So, friends, to get the AdSense script code, you can go to the Ad summary menu as shown in the example image below.

Info: Then you can click the Get Code button as shown in the image above
Copy code
After you click the Get Code button , the code will appear in a pop-up notification as shown in the image below.

Info: Copy the script code then paste it under the <head> code or between the <head> code and the </head>
Email Notification
Okay, friends, after you have completed all the steps above, you can check the email you used to register for Adsense. At the same time, the admin will discuss an example of an email notification if you are successfully approved.
Adsense Latest Version
If you have just registered for AdSense using an email, the notification sent will be as shown in the example image below.

Info: The example above is the email display when registering for the latest version of an AdSense account.
Adsense Previous Version
Meanwhile, in the previous version of AdSense, Google AdSense would also send a notification via email, as shown in the example image below

Info: The image above is an example of the appearance of the previous version of the AdSense email notification.
Script code
And in the previous version, the script code was sent together with an email notification like the example above. Well, as an example of sending the script code via email as follows.

Successfully Approved
If your website is successfully approved, Adsense will also provide a notification via email, for example, you can see the following image

Info: Well, friends, if you have received an email like the example above, you must be really happy. You can ask the person who first registered their website with Adsense how they felt when they were successfully approved.